Although these test files have been carefully designed, this website is not a substitute for a proper hearing test. You are encouraged to consult an audiologist as soon as you seriously feel concerned about a possible hearing loss. Beware, some of the audio tests tones can be damaging (excessively loud) if used improperly. You will be safe though by following the sound level calibration procedure and always starting by playing the quieter files first.
The next three sections take you through the actual hearing test. The rest of the page will give you information about hearing loss, audiograms, and how to get the most reliable results out of this page's hearing test.
1. Calibrate your sound levels
| Calibration File |
Using headphones, listen to the calibration audio file. Then, without your headphones on, rub your hands together closely in front of your nose, quickly and firmly, and try producing the same sound.
If you have trouble hearing the sound of your hands rubbing, the test is completed before it has even begun: you likely suffer from a severe hearing loss. If you are wearing hearing aids, you can put them on now, and use this test to check if they are working correctly.
Adjust your computer's volume so that both levels match: the calibration file through your headphones, and your hands rubbing, without headphones. Once matched, do not change your levels anymore during the rest of the hearing test.
2. Listen to the individual test files
In a silent environment, starting from the top row, move down until you hear a tone. Do this for each column.
Always start with files on top of the table. The bottom files are for severe hearing losses, and will play very loudly for a normal hearing person!
Stop with the file whose tone becomes just audible - not the file above or below - before switching to the next column.
3. Review your personal audiogram
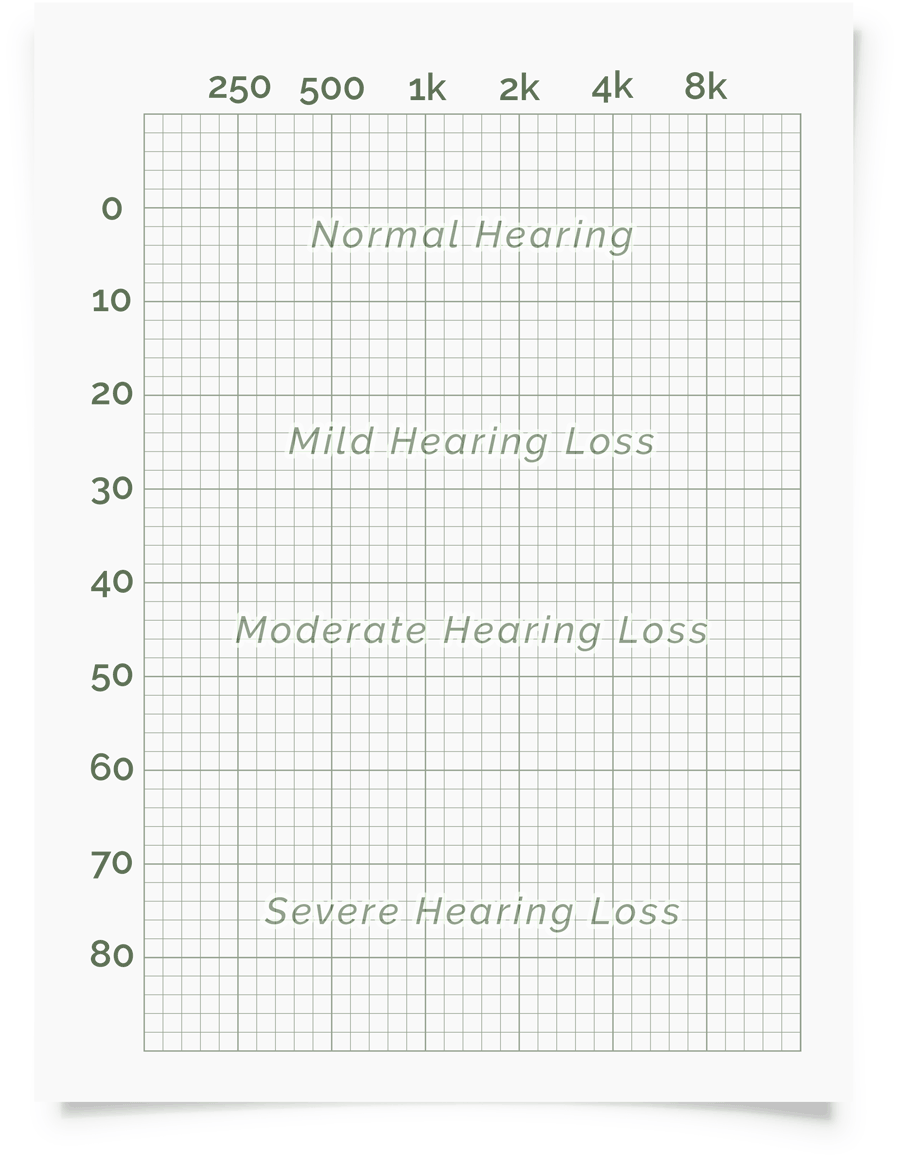
Your personal hearing thresholds should now appear on the audiogram below. Ideally, the markers should be located on the top of the graph, around the zero range.

This graph is similar to what your audiologist's system would produce during a hearing test, and plots the softest sounds you can hear across the different frequencies tested. Ideally, the six markers should be located on the top of the graph, around the zero range. The next section explains the audiogram in detail.
Click the 'Overlay' button to add information on top of your audiogram.
The first overlay outlines the area related to conversational speech. It is in the shape of a banana and is often referred to as the “speech banana.” Vowels are located on the left side of the banana (the green area), and consonants are to the right (the blue area). Remember, all the sounds located above your individual hearing thresholds will be inaudible to you. If your personal markers are located inside (or worse, below) the speech banana, it means that your hearing will be missing part of the conversation, requiring your brain to compensate for this deficiency, by guessing words, for example.If you have mastered this hearing test and want to achieve a higher precision, try the alternate test which adds in-between frequencies and hearing levels. To keep the sound table small, the alternate test has been split in two frequency ranges. Make your choice below, proceed to section 2, then check your audiogram again.
The second overlay depicts some familiar sounds of our everyday life, such as rustling leaves, birds chirping, water dripping and other common sounds.
What is an audiogram?
The frequencies (or pitches) that have been used during your hearing test are shown on the horizontal axis (the vertical lines). These frequencies are low on the left side of the audiogram (250Hz), then gradually climb to higher frequencies on the right side (8000 Hz or 8kHz). Humans hear frequencies from 20 Hz up to 20,000 Hz, but an audiogram only shows a subset of our hearing range: it focuses on the frequencies that are the most important for a clear understanding of speech (the spoken words).
The volume (loudness) required to reach a person's hearing threshold is shown on the vertical axis (the horizontal lines). These are expressed in deciBels Hearing Level (dBHL). dBHL are not absolute loudness levels but represent a difference between your hearing and the average "normal" hearing. When scoring 0 dBHL, your hearing exactly matches the norm; higher values are signs of hearing loss. There are tolerances though: normal hearing is defined by thresholds lower than 15 dBHL at all frequencies, not strictly at 0 dBHL. The loudness scale goes from very soft sounds on top (-5 dBHL) to loud sounds at the bottom (80 dBHL).
As you perform this hearing test, markers will be set on the audiogram, and will correspond to your personal hearing thresholds. Once the test is completed, you can read the audiogram as follows: Every sound located above the markers will be inaudible to you. The Overlay button gives you an idea of what these sounds could be.
Keywords
Hearing, hearing loss, hearing test, audiometry, audiometric test, audiogram, audiometer, audiologist, hearing levels, hearing thresholds, pure tone audiometry, warble tones.

Welcome!
My name is Stéphane Pigeon, I am an audio engineer and professional sound designer. I have been looking for a convenient and reliable way to assess my hearing, online. As I couldn't find any online test that was able to evaluate one's hearing thresholds, I designed my own test, and put it online. Measuring hearing thresholds requires calibrated equipment. Therefore, most audiologists will tell you that such a test can not be put online, and just run on any computer. Well, yes, it can. Here I show how it is done. I do claim the intellectual property related to the hand rubbing calibration trick. The original test appeared on AudioCheck in July 2012. HearingTest.online offers an improved version of my original test, with upgraded test tones and a better user interface.
Enjoy!
Stéphane
How to efficiently use this hearing test!
This online hearing test offers a convenient way to check your hearing over time, allowing you to detect a possible hearing loss or a degradation of your hearing as soon as possible, without the need to consult an audiologist for this routine check. Although this website has not been designed as a substitute for a proper hearing test, it will give you valuable information regarding your hearing when you need to:
- confirm your good hearing, and take a snapshot of your audiogram for future reference
- confirm if your hearing has returned back to normal after your ears were stressed, such as during an extremely loud concert
- precisely track how your hearing evolves over time
- confirm your suspicions about a possible hearing loss
- keep track of your hearing after your visit to your audiologist or primary care physician
- assess the performance of your hearing aid(s)
- diagnose hearing aid deficiencies
The calibrated condition assumes that you are using good headphones or speakers - their response must be flat across the tested frequency range (250-8000 Hz) - and you succeeded in calibrating your sound levels properly. In such a case, the precision of this hearing test is estimated at around 10 dBHL, which is good enough to diagnose a mild, moderate or severe hearing loss: simply, look at your threshold plots on the audiogram and give them a 10 dBHL tolerance.
The uncalibrated condition can be understood through the worst-case scenario: your headphones or speakers are poor performers, and you did not bother calibrating your levels as suggested in our first step. In such a situation, you won't be able to infer any information about your actual hearing loss, but you will still be able to use this website in a very reliable way through differential testing.
Differential Testing
All it takes it is to run the hearing test once to acquire a reference: note your computer level settings precisely, and remember how your audiogram looks (or better, bookmark → this page). By using these exact settings the next time you come back, any change in your audiogram will result from a change in your hearing. Even if the test was uncalibrated in the beginning, using the same computer settings and audio equipment from one test to the other, ensures that the changes you observe will be relevant to your hearing.
Differential testing can be useful in many situations:
- keep track of your hearing, and feel reassured if it remains stable over time
- confirm your hearing hasn't changed since your last visit to your audiologist
- confirm your hearing aids keep working properly over time
Differential testing also encourages you to call your audiologist for an appointment, when your audiogram shows significant changes.
Differential testing requires that you run the hearing test at least once in order to acquire a reference. Do it now, and print (or bookmark) your results for future reference. This printable page has been designed for such a purpose.
A word for the Audiologist visiting this page
I've been through a hearing incident myself and spent some time in hyperbaric oxygen therapy. One of the constant stresses I remember, was not entering the compression chamber, but the absence of any means that I could use to define what I perceived as an hearing loss, possibly exaggerated by my anxiety. This website will help people diagnosing changes in their hearing and encourage them to consult an audiologist sooner, when needed.
An online hearing test runs in a completely uncontrolled environment, and will never replace the calibrated test performed at your office. Yet, this simple test can be very informative, especially in differential testing conditions.
My goal is to build one of the better - if not the best - online hearing tests available on the Internet. Currently, the test files are based on the ISO 389-7:2005 international standard and use third octave band warble tones in order to minimize room and headphone resonance. Among the different standards in use, ISO 389-7:2005 is the one recommended by the British Society of Audiology, and does not rely on a particular type of headphones.
Please do not hesitate to contribute to this website, and share your comments, thoughts and corrections with me. If you are convinced of the usefulness of such a website and have access to a calibrated audiometer, please consider performing your hearing test, and compare your results with those provided here. By sharing your offsets with me, I will be able to improve the calibration part of this test. The more data I get, the more statistically relevant it will become.
Thank you for your precious contribution!
Featuring this test on your website
Be respectful, don't steal my code and files – they are protected by copyright – but provide a link to HearingTest.online if you want to feature the test on your website. For further inquiries, contact stephane 'at' hearingtest 'dot' online.